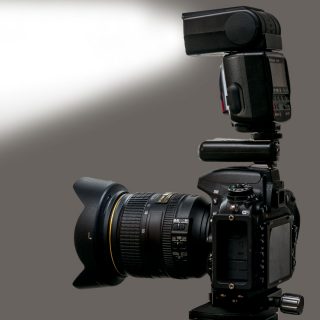
When I last updated my basic equipment for good real estate photography, attentive readers pointed out to me that something was missing – a flash to complete the equipment. A small discussion came up on the need or nonsense of using the flash.
I myself take 99.15 percent of all real estate photos with available light, i.e. without additional flash. I just pulled this current number from my Lightroom database (in the discussion I had estimated around 95 percent). Provided the correct capturing method is used, natural-looking pictures can be taken without a flash – and without a great deal of time. I rarely use the flash, but never put it on top of the camera for real estate photos.
The aim must be to present inviting and friendly photos that enable us to assess an object without being there ourselves. The subconsciously collected experiences with lighting are basic for the viewer.
This post is about the pros and cons of using flash for real estate photos. You’ll find four reasons why flashing hurts property photos and four scenarios where flashing can be useful.
At the bottom of the page you will find recommendations for flash units.
4 Reasons for bad Image Quality caused by Flash
A flash is a very small and not really powerful light source. This results in disadvantages that damage the image impression if the flash is used directly in or on the camera.
1. Short range and uneven light distribution
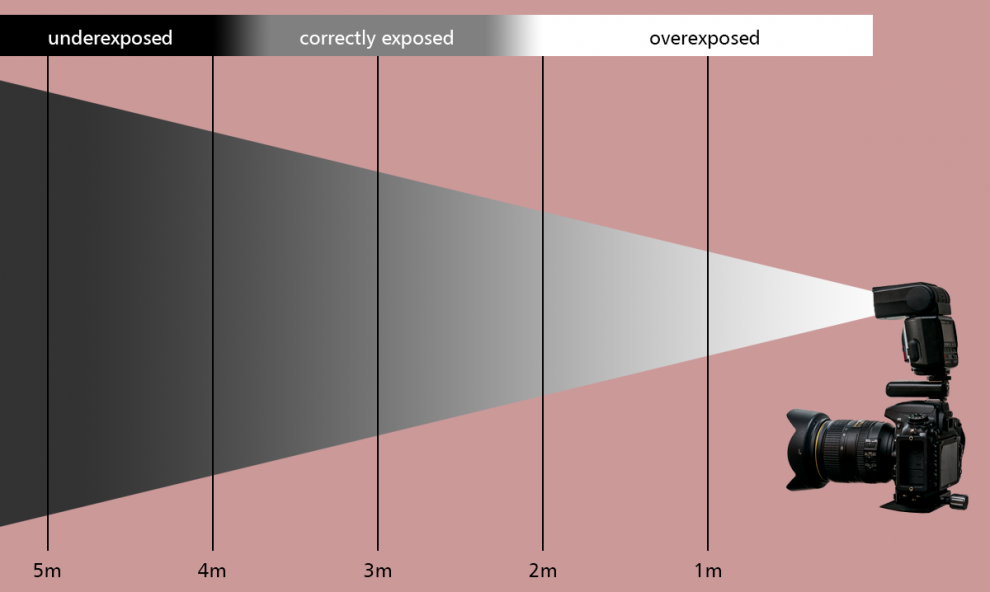
Even if the flash appears very bright when it is triggered, its range for photographic use is very small. Therefore objects or building components in the immediate vicinity of the flash are illuminated much too brightly, while its light is not sufficient for more distant corners of the room. This is due to the fact that illuminance decreases mathematically with the square of the distance from the light source.
This photometric inverse-square law is responsible for the rapid drop in light intensity with distance. If light with a certain intensity hits an area at a certain distance, an area of the same size at twice the distance will only be illuminated with a quarter of the light. At three times the distance, it is then only a ninth as brightly illuminated, at four times the distance it is only one sixteenth as bright, etc.

Schematic of the range of a flash: In this example, the flash at a distance of 3 meters leads to a correctly exposed photo (so-called 18% gray). Areas in front are overexposed, areas behind are underexposed. The strength of the light decreases squarely from one distance point to the next.
Flashes that are built directly into the camera are only suitable as party flashes anyway (they were originally intended for this private use). Larger strobes on the hot shoe are more powerful, but have the same problem with light falloff. If you increase the flash output, the far corner may be well lit, but the foreground is most likely completely overexposed.
2. Hard drop shadows
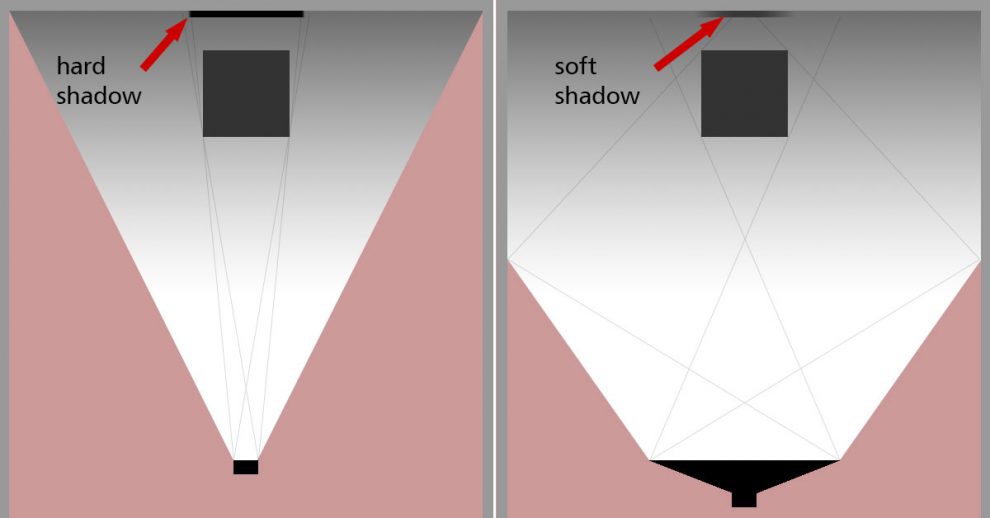
Due to the small light source, hard shadows appear on edges behind components or furniture.
On the one hand, this is due to the fact that the flash is never exactly in the optical axis of the camera. The flash is in most cases offset either slightly up or to the side (or both). It does not illuminate an object centrally, but somewhat laterally or from above. The object casts a shadow on the other side.
On the other hand, it is actually due to the small size. If the surface of the light source were to be enlarged, the light could hit the originally shadowed parts of the image from several directions and thus lighten the shadows. Soft light is created. This can be achieved, for example, with an umbrella or a soft box.

Left: A small light source, such as a directly used flash head, creates unnatural hard shadows of objects. Right: Large light sources and reflections from neighboring ceilings and walls create more diffuse light and thus soft shadows.
Links: Eine kleine Lichtquelle, wie ein direkt eingesetzter Blitzkopf erzeugt unnatürliche harte Schatten von Objekten. Rechts: Große Lichtquellen und Reflexionen von benachbarten Decken und Wänden erzeugen diffuseres Licht und damit einen weichen Schattenwurf.
3. Unnatural lighting
This shadow cast by the direct flash contradicts the natural lighting impression that we have when looking at an object. It would only be realistic if, for example, we were approaching a property with a powerful headlamp on our foreheads. This also has a small luminous surface and is above the optical axis of our eyes. Therefore, as soon as we see a flash photo, we subconsciously realize that something is wrong with the picture.
4. Unpredictable reflections
When we illuminate a scene with the flash, we first think about the image composition. We look at the scene and position the camera at the right height and angle to the room. However, we cannot say how the flash works, because it has a far too short duration (1/10,000 second) and our brain is far too sluggish to make a decision at the moment the flash appears. This only becomes clear in the finale image.
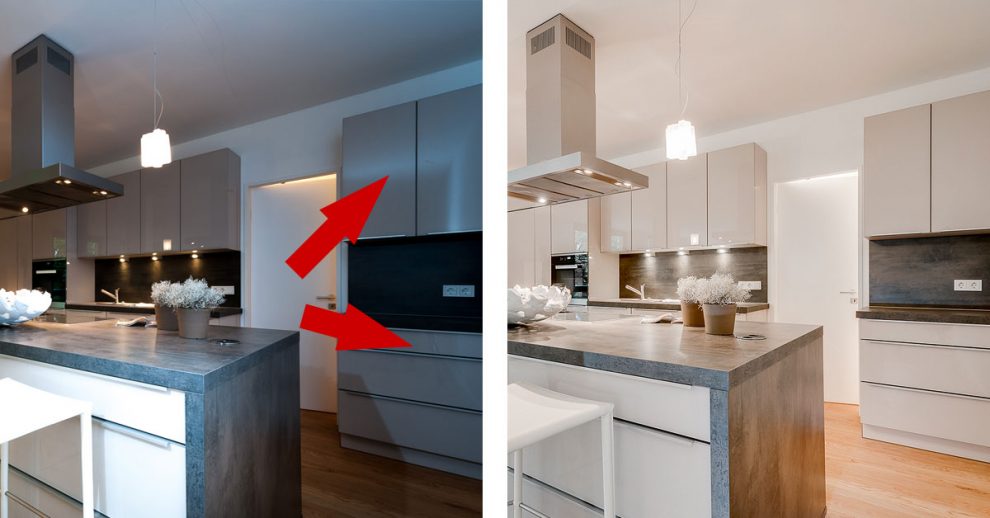
In addition to the range, the formation of shadows and the direction of the light, this also affects reflections on shiny surfaces. Due to the small light source, these always appear as point lights. It becomes particularly precarious in tiled environments such as bathrooms or kitchen units. But the lighting of nearby furniture or components is also reflected in shiny surfaces, such as shower glass walls or furniture fronts, as an unrealistic bright surface with structures of the room being reflected.

Left: The flash on the camera causes unexpected reflections on the ceiling, which are reflected in the shiny furniture fronts. Even at the bottom, the legs of the photographer and tripod can be seen. Right: Without a flash, even the reflections from normal room lighting are barely visible to the camera. But you have to control them, because you can see which errors appear in the motif before the picture is taken.
And yet: 4 examples of the sensible use of flash for real estate photos
There are scenarios where a flash can still be a good helper. Basically, however, the flash should never point directly from the camera in the direction of the photo. To do this, the flash must either be turned in a different direction or separated from the camera. In the latter case, the flash is triggered synchronously with the camera either via a cable, an optical signal (pilot flash or infrared) or by radio. Radio triggering has prevailed in recent years because it has become the most convenient and reliable connection for off-camera flashing.
I recommend not relying on the automatic mode when using flashes, but always working in manual mode, setting the flash output manually and approaching the right amount of light with test photos. Over time you will develop a feel for it and you will get the desired result faster and faster.
Note: All of these methods require a certain amount of experience and amateurs will hardly ever succeed with the first recording.
1. Lightening strong shadows from natural light sources
On sunny days, facades often show strong shadows under balconies, roof overhangs and in window niches. If you place a flash in the angle of reflection of the sun, it will illuminate shadowed areas. This softens contrasts and makes details in the dark areas visible. Because you have to cover a great distance and fight against the bright sunlight, the required flash power is clearly in the upper range.
2. Lightening small windowless rooms with little available light
The interior bathroom or hobby room usually have little natural light. Even if electric room lighting is not available, the amount of light is often not sufficient for meaningful photography. This is where using the indirect flash comes in handy. For this the flash head is aimed at the ceiling. If the flash fires, the ceiling looks like a large surface of light that scatters more even and soft light into the room. Here, too, the flash has to be operated with a higher power, because the small light surface of the flash has to supply light to a reflective surface that is about 4000 times larger in order to reflect it undirectedly into the room and cover a relatively long distance in the process. Considering the inverse-square law described at the beginning, the quickest way to reach your goal is to take a few test shots.
Tip 1: Shots get often better if you aim the flash light diagonally upwards and backwards, because then, in addition to the ceiling and it will hit a wall directly behind the photographer, the light will be even more diffuse. Ideally, the flash should also be unleashed here so that the subject receives a three-dimensional shadow.
Tip 2: It is of course important that the walls and ceilings have a neutral color (best is white). Otherwise there is a risk of light loss with dark paintwork or surfaces, and unattractive color casts appear in the image with colored surfaces.
3. Targeted lighting of individual subject areas
If you operate a flash with lower power and use it like a single lamp in the room, it can shed light on dark areas of the subject. Of course, the flash should not be in the picture during the process. It then acts like a spotlight or a light source that was used very deliberately. A light shaper (honeycomb attachment, tube) is recommended as an accessory, with which the light beam can be precisely aligned. Color filters are also often required to adapt the light color of the flash to the room lighting.
American architectural photographer Mike Kelley takes this technique to the extreme. He uses such light accents in a very targeted manner by taking 50 or more shots of a scene and then assembling them manually on the computer to create lighting pieces of art
4. Compensation for the bright daylight from outside
The differences in brightness between inside and outside are sometimes striking. You can counteract this by sensibly distributing several flashes in the room so that they increase the base brightness level inside. They are also not visible in the picture and cast indirect light into the scene. My American colleague, the real estate photographer Scott Hargis, perfected this process.
Conclusion
For serious real estate photography you should do without the flash and master the correct capturing method. This results in photos that correspond to the actual impression and are not distorted by qualitatively and quantitatively poor artificial light. Participants of my workshops learn this reliable method.
But yes, there are situations where lightning comes in handy. You should have one in your camera bag for that. However, its use requires practice and skill in order to produce images that do not appear unnatural.
Speedlight recommendations
In line with my recommendations for basic equipment for real estate professionals, here I present flash units for the individual camera brands as well as interesting solutions for unleashed flash use. The links lead to product information and search results on Amazon.
series α6…, α7(…) and α9(…)
series X-T…
Flash units from the Metz brand are recommended for all brands. Please pay attention to the compatibility with the respective camera, otherwise the communication between the flash and the camera may not work and in the best case you will pay a lot of money for a manual flash.
For unleashed flashes with Nikon and Canon cameras, the Yongnuo brand offers a comparatively inexpensive and now reliable wireless system:
Radio flash triggering systems with professional status can be found at PocketWizard.

