
 If you want to photograph the exterior of a property in a busy place, people will inevitably run into the picture. Rolling or floating vehicles are also part of the frame. But you want to remove people and objects, because that brings two problems.
- These objects may work against your intended static image statement (for example, „Facade of house xy“).
- The rights of privacy of people in the picture might be infringed.
You could stamp out these troublemakers piece by piece in post-production. But there is a much simplier solution on hand already while exposing the image. Earlier this month, I attended an architectural photography workshop in Venice and revived the old technique of long exposure under harsh conditions. Read here, how it works.
At the end of the article you will find some equipment recommendations again.
Long exposure make moving objects fade
In normal outdoor’s photography under daylight conditions, you often measure a relatively short exposure time of 1/125 second and shorter. People walking through the frame appear relatively sharp so that they are recognizable and even identifiable.
If you shut down the aperture on the camera and let less light on the sensor, then you need to increase the exposure time, in turn, to get a sufficient amount of light. In daylight you can reach values of perhaps 1/8 second or slightly longer. As a result, moving objects are often no longer identifiable, but still can be recognized as blurred shadows in the photo.
This may result in a great artistic effect, but is disturbing for the documentary approach of real estate photography.

At a long exposure time objects will occur blurred in the image
Long Exposure Does the Trick to Remove People
The more you amplify this effect, the less visible moving objects will be. They move through the frame during the exposure and no longer leave any sharp contours. Static structures such as buildings will dominate the exposure.
However, you have to counteract this by controlling the amount of light even stronger. The longer it takes to expose the image, the more light gets onto the camera sensor. Once the technical capabilities of the camera are used up, i.e. the aperture can not be shut down anymore and the ISO value can not be reduced any further, you can reduce the amount of light only by placing a dark filter in front of the camera lens.
Litterally the camera gets sun glasses.
In Venice, the workshop weekend was dominated by the well-known Carnival chaos. Many people populated the city. Even photographing normally quiet places provided busy scenes. Only with this technique, the desired static impression could be achieved.
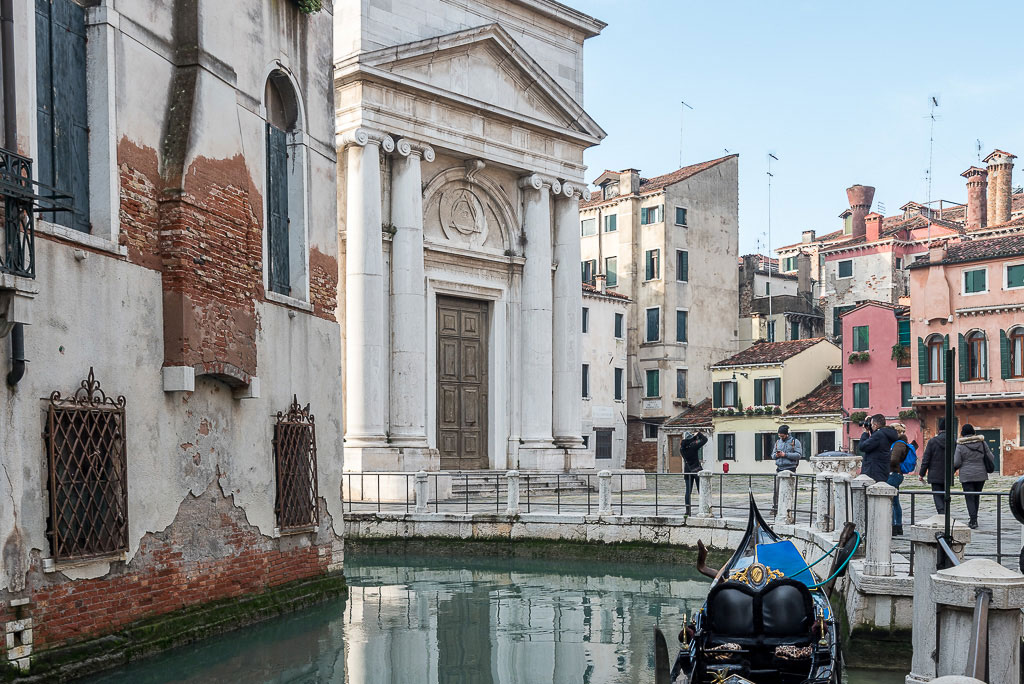
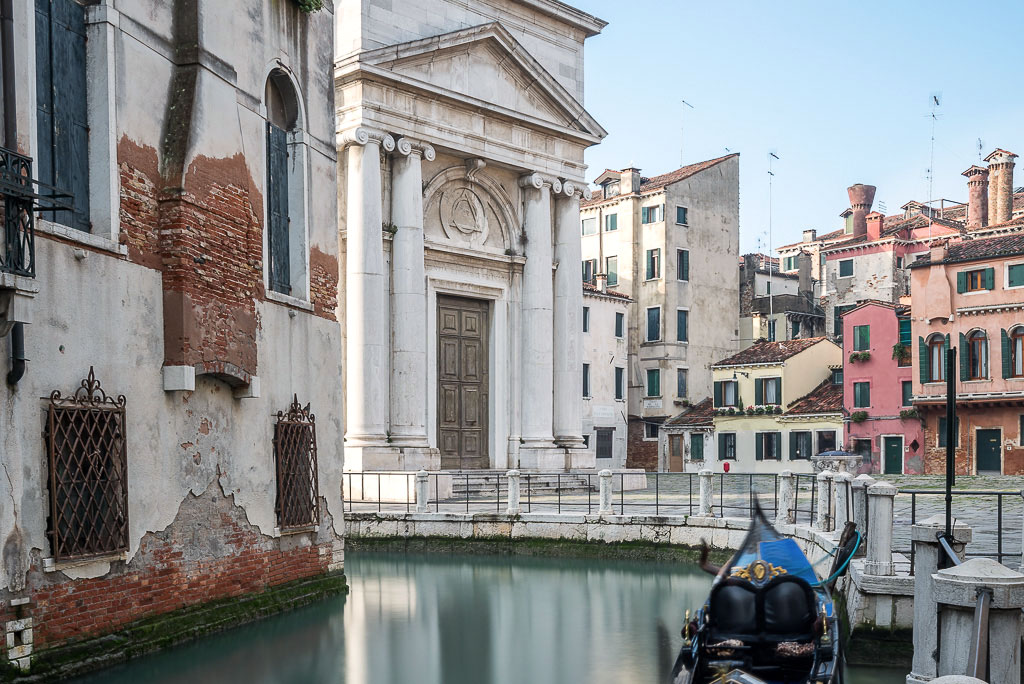
Crop of a Venice workshop photo
right: A normal exposure at 1/100 s shows people in the frame.
left: A long exposure with an ND filter at 3 minutes makes the tourists disappear.
Neutral density filters make long exposures possible
There are special photography filters for this purpose, which are tinted in a neutral gray. Due to the gray tone, these filters reduce the brightness, but retain the original coloration of the photo.
There are neutral density filters in different strengths. Some ND filters are so dark that you will not see any details with the naked eye when looking through them – they look like black glass. With these filters, exposures of up to several minutes are possible. You can even re-open the aperture on the lens for better image quality.
The specification of the filter strength ist somewhat confusing. There are three different types of writing and calculation, but in the end they all lead to the same result. Fortunately, most manufacturers labeled their filters with all three variants. Here is an example for the same filter, without going into the photographic and mathematical context:
- ND 3.0 – darkening strength of the filter glass
- ND 1000x – extension factor (here 1000 x, ca. 210)
- 10 Stops – number of exposure values (comparable to aparture steps) required to compensate the darkening effekt
5 Tips to Prepare Your Long Exposure
To achieve quick results, you should think about five aspects in advance.
- Put your camera absolutely shake free on a tripod.
- Use a remote release, to start your exposure shake free.
- Even if it may sound paradox: Switch off the image stabilizer on your camera and / or lens. Otherwise moving elements within the system try to fight against shaking, which does not exist. This results in unwanted unsharpness.
- At bright lightfall from the back you have to cover the view finder to prevent light entering the camera body this way.
- Start your photo shoot only with fresh batteries. Long exposure times and the intense use of the camera monitor need a lot of electric power.

Making of of the comparison images above in Venice: The camera sits on a tripod, is exactly levelled and there is mounted a slide-in ND filter in front of the lens. Shutter released touch free by an IR remote control.
The right workflow ensures best results
The problem with this type of photography is, that you often have to wait for the result on the camera monitor for a few minutes until the exposure is finished. If you have made a mistake in calculating the exposure time or focusing precisely, you have to start all over again. Therefore, it makes sense to memorize the sequence of individual steps and to follow them for each exposure exactly.
I recommend the following method
- align the camera exactly
- focus the camera precisely – either by using the auto focus and then switching it off, or even better manually and judging sharpness via an extreme enlargement on the camera monitor
- set the aparture in exposure mode A or Av and memorize exposure time
- mount the filters carefully, without changing the focus on the lens
- switch the camera’s exposure mode to manual and set exposure time to „bulb“
- calculate exposure time required from the exposure time in your memory and the enlargement factor of the filter (calculators including timer function can be found as an app for your smart phone)
- start exposure with a remote release and finish it after the timer is expired
The „bulb“ setting allows you to keep the shutter of the camera open for a specified period of time. When you press the shutter button, the shutter opens, and when you release it, the shutter closes. Some cameras, such as many Nikon models, also offer a „Time“ mode that allows you to open and close each time you press the shutter release button.
Conclusion
At a first glance this procedure may sound complicated, but the end justifies the means. Especially compared to retouching the image on the computer in post-production you will save a lot of time. With some experience the camera preparation takes less than half a minute.
How long you would finally need to expose for erasing people and vehicles from the photos depends, among other things, on the speed of the moving objects. In the tourist environment of Venice you can be successful with about three minutes. Hardly a person stays on one spot for so long – unless it is another photographer. :-)
Recommendations for Equipment
Besides my recommended base equipment (in German) you will only need a remote release and ND filters matching your lens size. For the latter you should not accept the cheapest offers, because they come with concessions in terms of equality and color fidelity.
Over the last years filter systems by HAIDA gained a good reputation amongst photographers. There are screw-in filters for the front thread of your lens or larger slide-in filters for lenses without a filter thread.
Two Important Notes
- For the screw-in model, I recommend to choose the filter diameter suitable for your largest lens and to equip smaller lenses with inexpensive step-up rings, so that the larger filters can be applied there as well.
- Buy a filter set with different shades of gray to be flexible. Darker filters are more pracitical. I’ve found that in daytime and sunshine a 10x filter still lets in too much light and a 15x filter is the better choice.
Here are a few accessory links to information on Amazon.
Remote Release
ND Filters Screw-in Version
- HAIDA Slim PRO II Digital MC, ND8x, ND64x, ND1000x
67 mm | 72 mm | 77 mm - Step-Up-Ringe 8 Set
49 – 82 mm
ND Filters Slide-in Version
- HAIDA 100 mm x 100 mm, ND8x, ND64x, ND1000x
100 mm | 150 mm - HAIDA Pro Filter Holder
100 mm | Tamron / Pentax 15-30 | Nikon 14-24