

Many real estate photos with crooked lines can be found on the Internet. I would prefer to instantly align them vertically, because the bricklayers probably built the house with an accurate spirit level. And you should be able to see that, too. Photos of buildings with vertical correction are simply more pleasant to look at.
This article shows how you can use almost any graphics program to align real estate photos vertically. I recommend the so-called central axis principle for exact alignment. For demonstration I use the professional software Adobe Photoshop, but the principle can also be followed with other modern programs. Then the keyboard shortcuts may be different.
Where Do these Crooked Lines in the Image Come from?
Quite often vertical lines on the structure or on the edges of furniture end up in the frame when taking a picture. If the camera is held at an angle, i.e. either rotated or tilted upwards or downwards, perpendiculars are no longer correctly captured by the camera in perspective. So-called converging lines are created. Most viewers do not feel as comfortable as if he were looking at a picture of the same scene with exact verticals.
The most common cause with indoor photos is that the camera is tilted downwards. That’s because we instinctively prefer to photograph more of the floor than the ceiling.
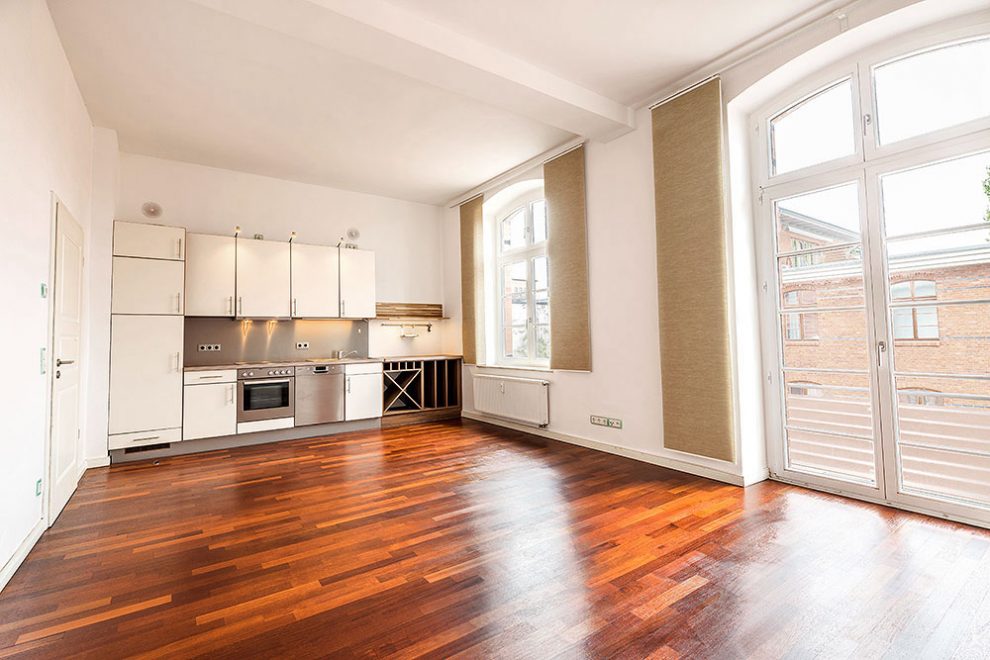
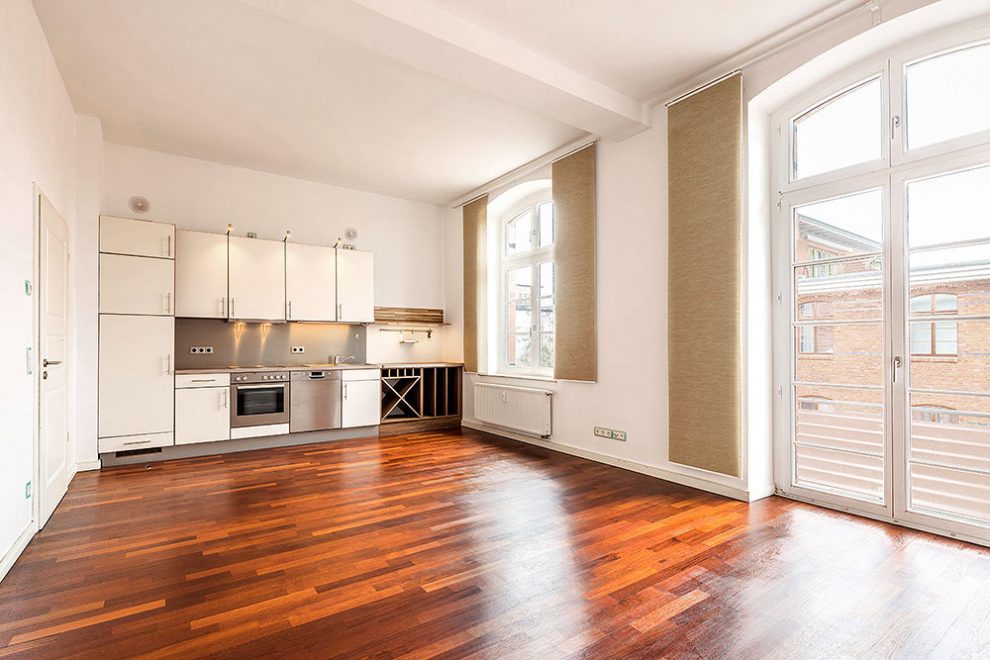
The comparison – left: image with converging lines, right: image with corrected lines
In the case of outdoor shots, however, there is often not enough space to the rear to display a facade vertically correct in full format – so the camera is tilted upwards.
The best way to avoid crooked lines when taking pictures is to align the camera correctly.
Bonus Tip for Interiors
Get on your knees to take a shot. You will be surprised.
However, if the pictures have already been photographed crooked, you can still correct them in image processing within certain limits.
Take these 3 Steps for Vertical Correction
The three steps are rotate – align – crop and include several small sub-steps.
With a little practice the vertical correction for a real estate photo can be applied in less than 30 seconds. Some programs offer automatic functions, but experience shows that they never work as precisely as the following simple procedure.
This is what the original shot looks like, opened in (a German version of) Photoshop:

1 Check whether the camera was rotated and correct if necessary
When taking pictures, the camera is often not only tilted, but also twisted slightly. This mistake should first be checked and corrected in order to minimize later distortions. To do this, the image has to be set vertically on its central axis.
- drag a vertical guideline from the vertical ruler on the left to the middle of the image, before you may need to switch on rulers (Ctrl + R / Cmd + R)
- select the entire area (Ctrl + A / Cmd + A) – a dashed border (marching ants) becomes visible
- activate free transform mode – handles at the corners and in the middle of the image edges become visible (Ctrl + T / Cmd + T)
- outside the selection, the cursor turns into a rotation arrow

- rotate the image so that near the center a vertical edge is parallel to the guide line (in this case the window frame)
- confirm (click on check mark or press Enter)
- deselect (Ctrl + D / Cmd + D) – the dashed line disappears

2. Remove Converging Lines
Due to the vertical central axis, the converging lines on the right and left now have roughly the same angle. This allows the actual correction in some programs in just one step (d). If the distortion is very strong, it may be necessary to repair one side separately later (e), as some camera lenses have small optical defects.
- draw vertical guidelines near vertical edges on the right and left sides – the more these lines are on the edge of the frame, the more precise the alignment will be – in this case the room and the balcony doors are suitable
- select entire area (Ctrl + A / Cmd + A) – marching ants become visible again
- activate free transform mode (Ctrl + T / Cmd + T)

- perspective transform by eye – push one of the lower corner handles inwards while holding down the key combination Ctrl + Alt + Shift / Cmd + Alt + Shift – the image is compressed or stretched equally on both sides – until vertical elements run parallel to the guidelines
- if one side is not exactly vertical to the guideline (lens inaccuracy), move the relevant corner handle separately while holding down the key combination Ctrl + Shift / Cmd + Shift until it fits exactly

- reduce the resulting compression or stretching by correcting the image on both sides – drag the center handle to the original edge of the image – with new Photoshop versions (from V20) while holding down the Shift key – otherwise the image will be scaled
- confirm (click on check mark or press Enter)
- remove selection (Ctrl + D / Cmd + D) – the dashed line disappears

3. Crop the image to its final format
Due to the rotation and alignment, some areas of the image are usually lost on the frame edges. Other areas are now empty because the edges of the new image no longer run parallel to the outer edges of the original image area.
- select crop tool (C)
- choose the aspect ratio if necessary
- select the final contents of the image
- confirm (click on check mark or press Enter)

This is how the finished photo looks after the vertical alignment in Photoshop:

For speed enthusiasts
When working in Adobe Lightroom and Adobe Camera Raw, I recommend an even faster and more precise variant for vertical correction (4 mouse clicks, 5 seconds, done). This is part of the workflow in my photo editing workshop.