

There is an endless amount of bad real estate photos. A random look at any of the common real estate portals is sufficient. *sarkasmmode_on* The only advantage: These few offers with strong photos are immediately noticeable. If these are yours: „Congratulations!“ *sarkasmmode_off* But why are many beautiful properties so badly illustrated? Digital photography is to blame. And these easy-to-use photo tools that almost everyone carries around in their pocket these days. They tempt you to take snaps instead of taking photos. They are used almost thoughtlessly, and in the photographic process several deadly sins are committed at the same time.
What do we want to achieve with real estate photos? We want to convince the viewer, we want to invite him to take a closer look at the property, we want to arouse interest. For this we need a „pleasant viewing experience“. And that, in turn, only succeeds if the photos meet basic standards.
Do you know this scenario?
At a family celebration, Uncle Bob pulls his smartphone out of his pocket and shows the photos from his last vacation in the Harz Mountains.
- Bob is a technology fan, but no details can be seen on the black locomotive of the historic Brocken railway because the surroundings were bathed in blazing sunlight.
- The view from the highest Harz mountain might have been breathtaking, but the crooked horizon should have caused the houses in the distance to collapse.
- Then there are countless pictures of breakfast and dinner buffets, all of which look equally boring.
- And finally, he shows a sociable group with faces of unknown holiday acquaintances which are completely blurred.
And the strange thing about it: Uncle Bob is proud of these photos. He’s not aware of any mistakes because he’s so excited by the sheer possibilities of this little camera. The rest of the relatives nod, saying „Aaw!“ and „Ooh!“ – at best because they want to be polite.
In most cases, however, the viewers do not recognize these deadly sins either, because they take just as bad photographs themselves. They are satisfied with their own pictures of lousy quality.
It’s not decisive for vacation photos, but…
Deadly sins when Photographing Real Estate
… the bad thing is, that many real estate professionals produce photographs for their own business by following the same simple standards. Because this annual analysis proves again and again that such miserable photographers obviously make up the majority of real estate agents.
It is so easy to get better photos with a few small steps and a little know-how.
In this post, I only refer to mistakes that are made in the process of taking the images. For the time being, we almost ignore the insufficient preparation of a photo session or the wide range of errors in image retouching.
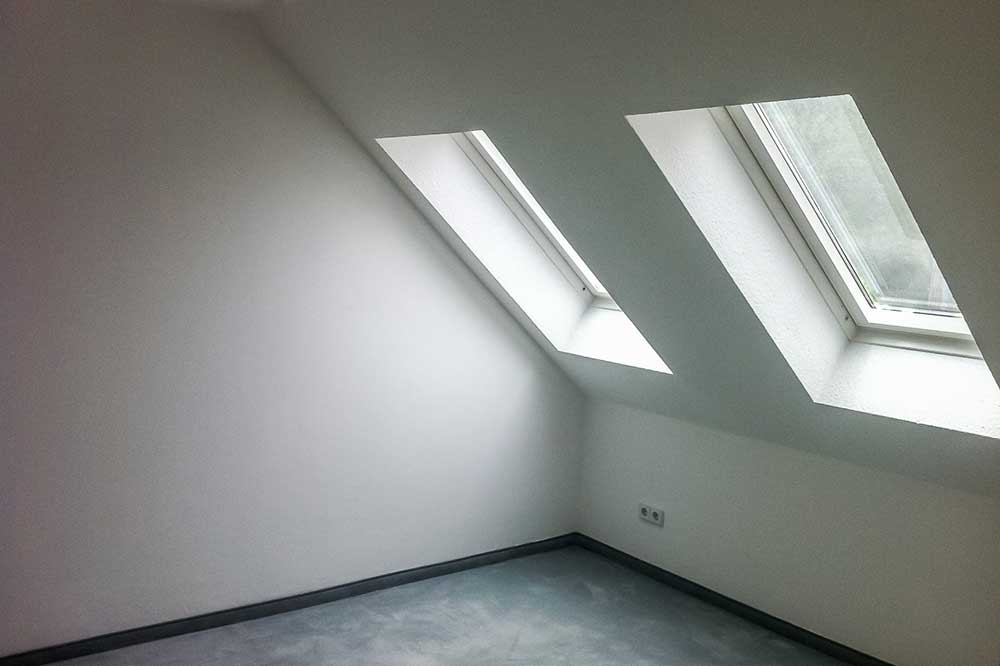
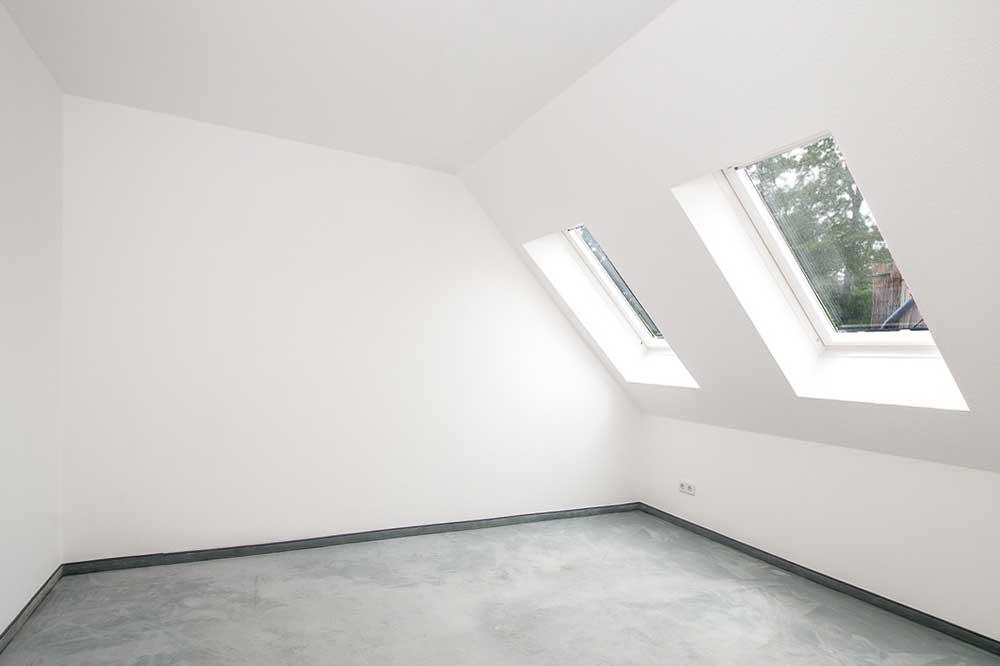
Deadly Sin 1: Crooked Lines
When we photograph an interior, we tend to automatically tilt the camera down. There are psychological reasons for this. The effect, however, is that in the photo vertical lines of the building and the furniture diverge upwards. However, the bricklayer probably built the building with a spirit level, so that the vertical edges of windows, room corners or doors are actually vertical.
Incidentally, the same applies to facade shots outdoors. Only here, in contrast to interiors, the cameras are often directed upwards, which inevitably leads to lines converging upwards.
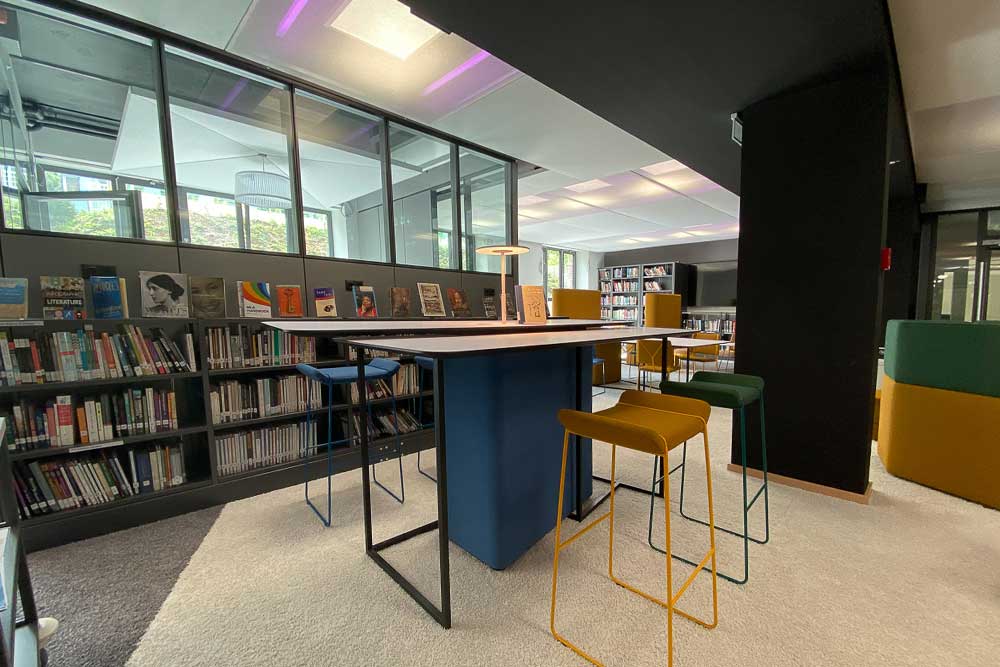
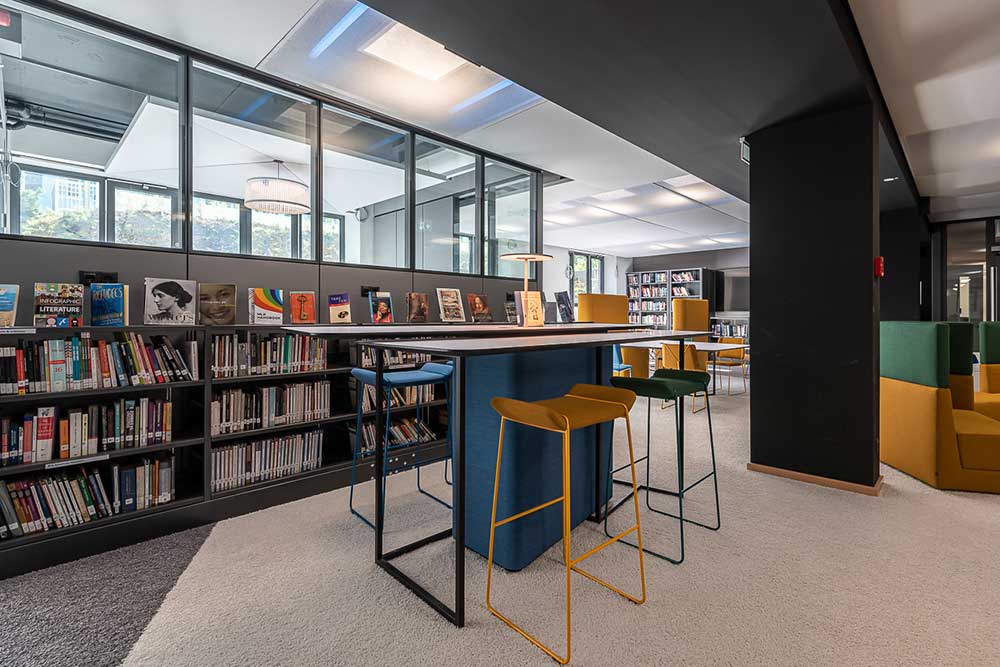
In a library – left: vertical lines are crooked, the picture appears uncalm/
right: everything vertical, camera precisely aligned (and the furniture was moved a bit)
Solution: The viewer of the images gets a more comfortable feeling when the verticals are also shown vertically. This can be achieved with correct camera alignment.
You can also cheat the correct alignment later on the computer, but the image result becomes more realistic the less you have to intervene in the perspective afterwards.
Small addendum: If you stand exactly parallel to an opposite wall or facade when taking the picture, then the horizontal edges must also be exactly aligned. If you take a picture of a room at an angle or the facade from the side, only the verticals are affected.
Deadly Sin 2: Burned out or submerged image areas
Available light is often a problem. The bright areas are mostly burned out or the shadows drown in dark tones. Both may occure under harsh lighting conditions. This is due to the poor performance of our cameras. Even very good cameras can only show about half the brightness levels of our human vision in one image. The camera usually chooses to correctly expose one extreme or the other, or the middle (then both extremes are affected).
In interior photos, for example, this applies to the stark differences in light between indoor and outdoor areas, or in outdoor photos between a bright facade and strong shadows from the blazing midday sun.
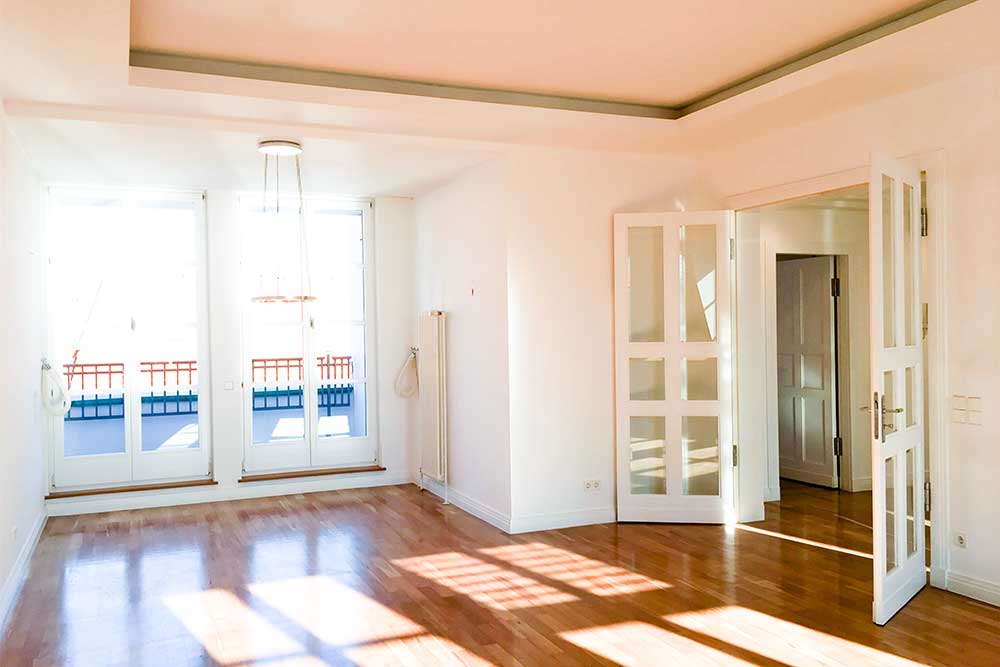
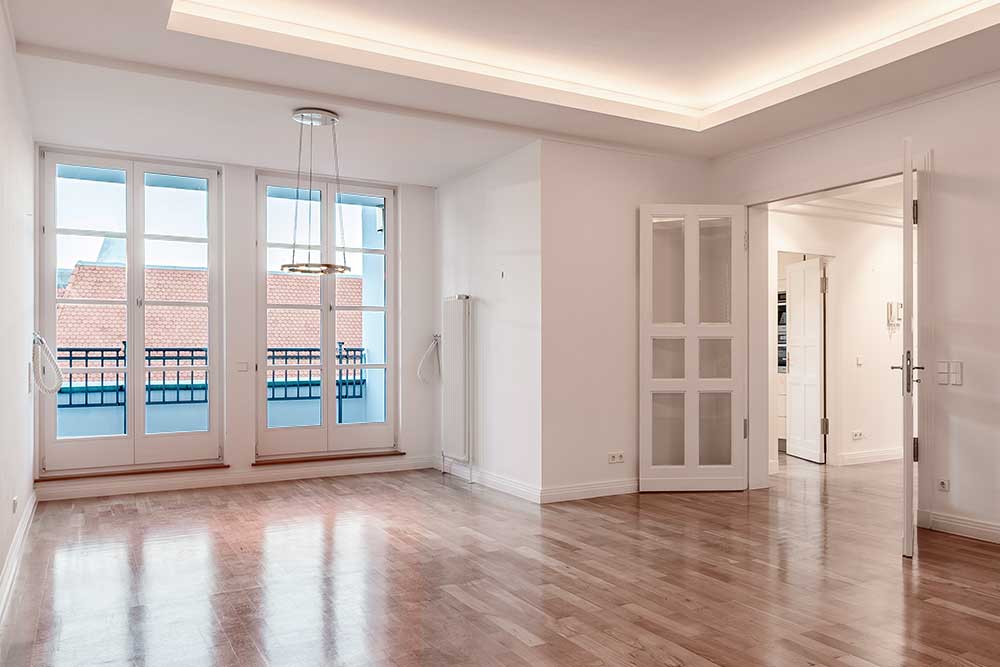
left: taken in bright sunlight (5:17 p.m.), with the lights off and with the small sensor of a smartphone /
right: waited for the sun to drop (7:22 p.m.), switched on the light and photographed with a „real“ camera
Solution: Apart from special photography and image processing techniques, you can counteract this dilemma with three measures even with a normal photograph:
- It is therefore a good idea to take photos when the differences in light are not so great: i.e. in the morning and afternoon hours. Bright midday sun should be avoided. Overcast skies would be ideal but are refused by most brokers. Okay, so let’s explore more options.
- Differences in light can be further reduced by turning on the lights when shooting indoors.
- A camera with a large image sensor can process the light differences better than the mini sensor in small cameras or smartphones.
In most cases, however, it will still be necessary to correct these images on the computer. With the measures mentioned above you can minimize other bad side effects, when the tone correction needs to be aggressive in post production.
Deadly Sins 3: Unclean image edges
A mistake that is often made in the heat of battle is number 3 in our catalog of deadly sins: annoying things at the edges of the picture. In outdoor shots, there are individual twigs that protrude into the picture or garden elements that are cut off at the edge of the photo. In the case of interior photos, this often affects door handles and light switches that have been cut off, as well as furniture or technology items in the apartments.
This often happens with photo amateurs because they concentrate on the main subject in the middle of the image. For the viewer, who was previously unfamiliar with the subject, edge disturbances have a distracting effect. That cannot be the aim of a good real estate photo.
Solution: Before you press the shutter button, it is best to let your eye wander around the image in the viewfinder or on the monitor and correct the camera position or focal length if necessary.
Deadly Sin 4: Direct Flash (On Camera)
We talked about light two sins ago. So what could be more obvious than creating light balance with sufficient artificial light? Many people like to use on-camera flash and try to illuminate the scene with it. The trouble with this light source, however, is that it is comparatively tiny. Its lighting power usually does not exceed that of a party flash. There is a relatively strong light fall-off, so that parts of the subject close to the camera are overexposed and objects further away appear underexposed. In addition, a flash that points directly from the camera into the scene creates harsh and unreal shadows.
Solution 1: Take photos without a flash. With the right camera settings, you can create very well exposed images with available light. The use of a tripod is recommended because sometimes exposure times are longer and there is a risk of camera shake.
Solution 2: Use the flash off-camera and place it like a light source (floor lamp, spotlight) in the room. The flash is best controlled wirelessly or by radio. This additional equipment is available for little money.
Deadly Sin 5: Extreme Wide Angle
When it comes to real estate photos, there is often a dilemma: Many rooms cannot be shown in one frame in their entirety. So the real estate photographer uses an ultrawide-angle lens. Although this special optic can capture large angles of view, it has some optical disadvantages:
- Objects at the edges of the image appear distorted.
- Objects in the center of the image appear significantly smaller.
- The image quality decreases towards the edges of the image and especially the corners.
- And most importantly, a small room appears larger than it actually is.
left: without sufficient wide angle (compact camera) only a corner of the room is actually photographed /
right: with ultra wide angle in the optimal position, the entire room is shown (and of course it is properly photographed)
Solution: Yes, go ahead and get yourself a powerful ultra-wide-angle zoom lens. But don’t use the entire spectrum. Keep the extreme focal length as an „emergency reserve“ if there really is no other way.
As a rule of thumb: The maximum wide angle should be no more than 35% of the normal focal length. If you’re shooting with a camera with an APS-C sensor, that’s around 12mm, while with a full-frame sensor it’s around 18mm.
If you can capture the room with a larger focal length than 12 / 18 mm, so much the better – then set the lens to the appropriate higher value.
Deadly Sin 6: Disorder in the picture
Yes, I know: you are a real estate agent and not the mum who cleans the room for other children. Nevertheless, pictures appear more harmonious when there is a certain order. Again, it’s about not distracting the viewer from the actual subject. In principle, there are two types of order:
- factual order (cleanliness & tidiness)
- optical order (reduction & harmony)
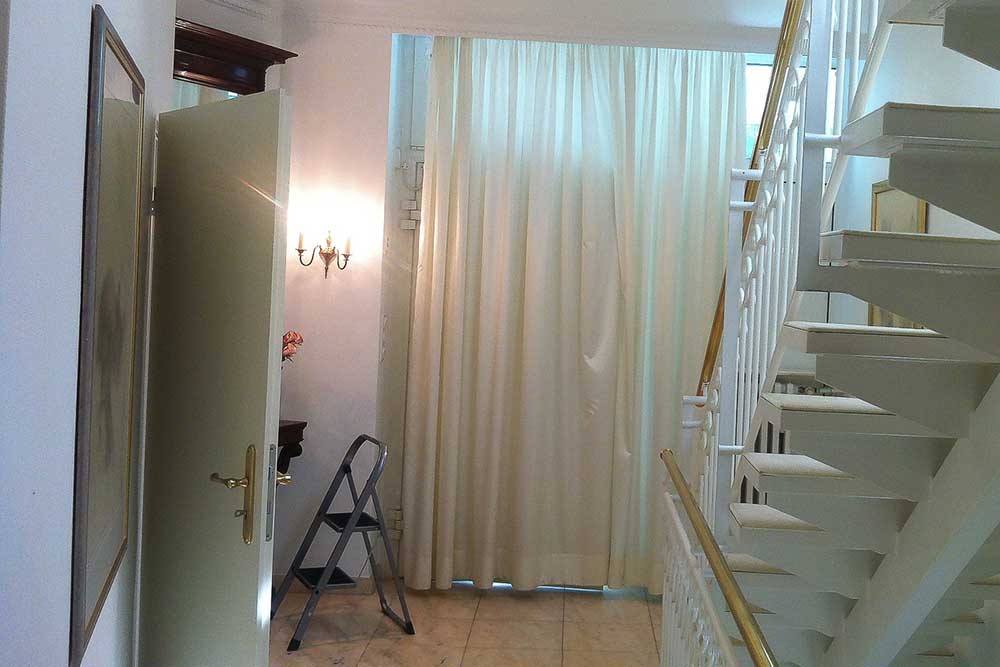
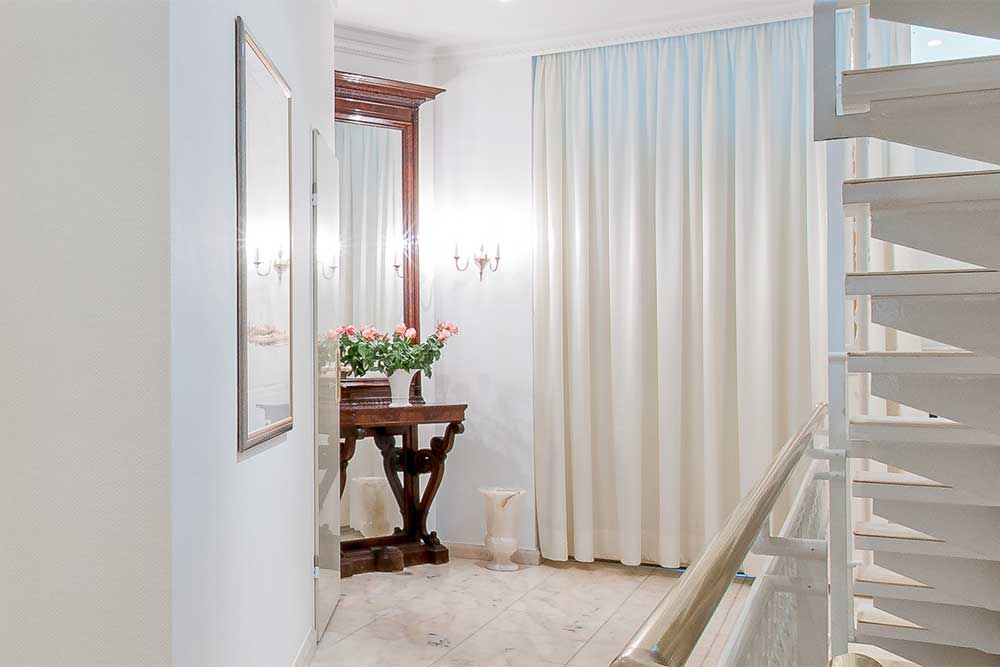
left: original state / right: after 2 minutes of work (ladder removed, door closed, curtain straightened, floor vase rearranged
and of course neatly photographed)
Solution: Every real estate agent who takes photos has his own tactics here: In my real estate photo workshops, some real estate agents report that they send out a checklist in advance with important things that need to be prepared for the photo session. There are those who stop the photo shoot and come back when there is order. Others remove any clutter themselves. And still others accept the mess and just take pictures (or hope that the mess can be photoshopped afterwards).
Of course, it also depends on who is responsible for order. With tenants it is naturally more and more difficult, with owners you can enforce order by pointing out better marketing.
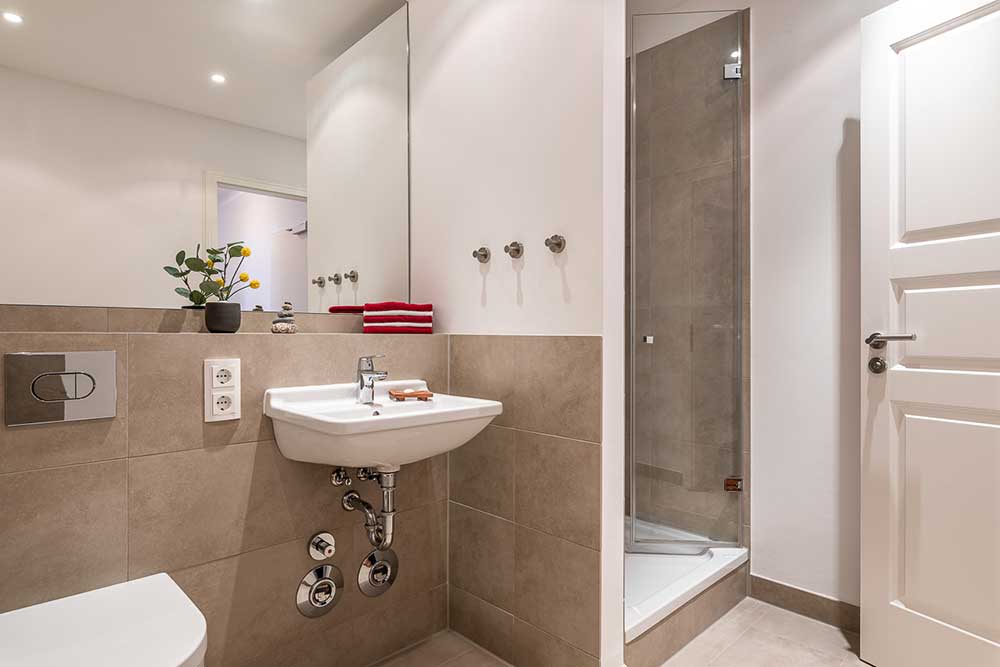
Deadly Sin 7: Unwanted Reflections
Modern rooms today are often equipped with reflective surfaces. This starts with the normal dressing mirror, but continues immediately with shiny furniture fronts, glass and tiled surfaces in kitchens and bathrooms and large window fronts. There are basically two pitfalls to avoid:
- The photographer and his equipment can appear in the reflection.
- Light is reflected that doesn’t fit the image because it’s coming from an area outside the photo.
Here, too, the aim is to prevent the viewer from being distracted from the actual image content.
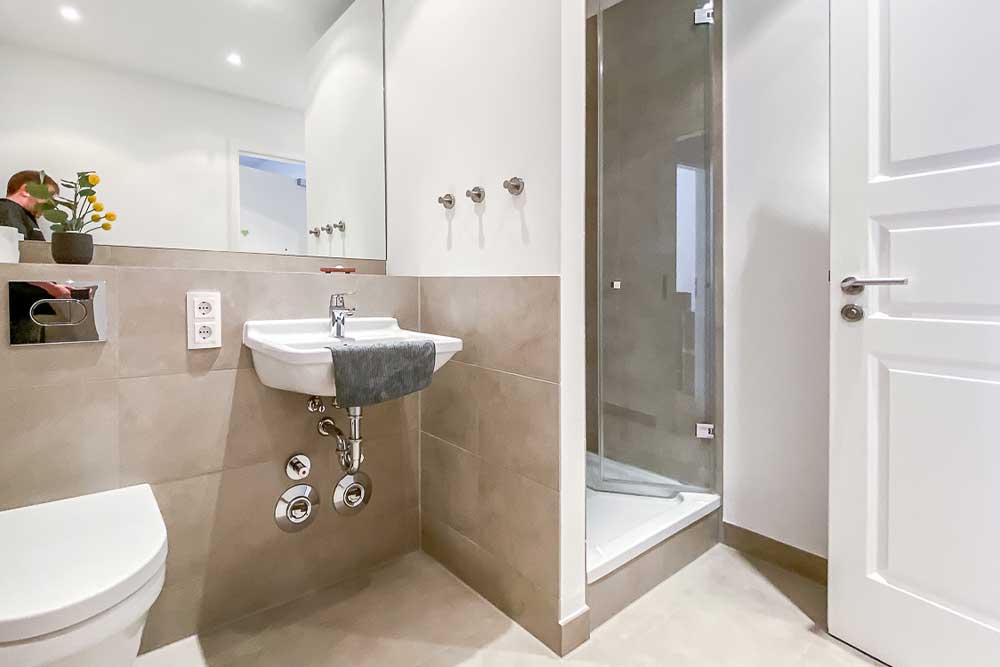
left: photographer can be seen in the mirror and in the toilet flush despite the flower pot, reflection from the hallway in the shower door /
Right: No disturbing reflections – the photographer was in the next room, the camera was triggered remotely, the shower door was closed a few inches.
Solution 1: Examine the photo carefully before taking it and especially afterwards to see whether such reflections occur. Those photographers who shoot directly into a tablet or laptop have an advantage because they can perceive such disturbances much better on the large screen. Then remove the reflection source or change the recording position.
Solution 2: If you cannot prevent the reflection, you can try a so-called polarizing filter. This is mounted on the lens and can reduce reflections on non-metallic surfaces. In any case, you have to experiment a bit here, especially since the effect depends on the angle of incoming light. When it works, the result is amazing.
Conclusion: Avoiding deadly sins is relatively easy
You have now read some solutions on how to avoid these deadly sins. Of course, the whole thing starts with the right photo equipment. Yes, I know: ‚The photographer takes the picture and not the camera.‘ But without the right tools, all the effort is often in vain.
And for the photographer to know how to prevent the deadly sins in detail and above all efficiently, some further training is also advisable.